Vernier caliper is a commonly used length measuring instrument in industry, which can be directly used to measure high-precision workpieces, such as the length, inner diameter, outer diameter, and depth of workpieces.
Vernier caliper, as a widely used high-precision measuring tool, is composed of a main ruler and a sliding cursor attached to the main ruler. If divided by the scale value of the cursor, the vernier caliper can be divided into three types: 0.1, 0.05, and 0.02mm.
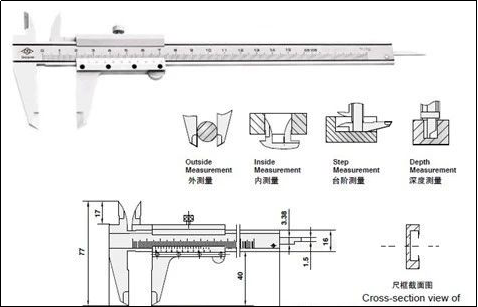
Taking a precision vernier caliper with a scale value of 0.02mm as an example, the reading method can be divided into three steps;
1) Read the whole millimeter from the nearest scale on the left main ruler according to the zero line of the secondary ruler;
2) Read the decimal by multiplying the number of lines aligned with the scale on the main ruler to the right by 0.02 based on the zero line of the secondary ruler;
3) Add up the integer and decimal parts above to obtain the total size.
Reading method of 0.02mm vernier caliper

As shown in the above figure, the scale in front of the main ruler is 64mm from the zero line of the auxiliary ruler, and the 9th line after the zero line of the auxiliary ruler is aligned with one of the scoring lines of the main ruler.
The 9th line after the 0 line of the secondary ruler represents: 0.02x9=0.18mm
So the size of the measured workpiece is: 64+0.18=64.18mm
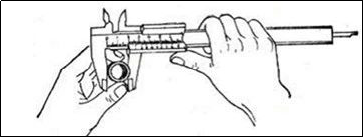
As a commonly used measuring tool, vernier calipers can be specifically applied in the following four aspects: 1) measuring the width of workpieces
2) Measure the outer diameter of the workpiece
3) Measure the inner diameter of the workpiece
4) Measure the depth of the workpiece
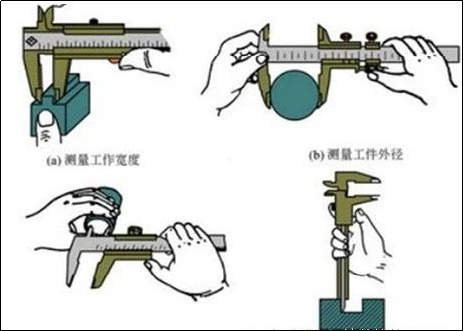
Before use, the measuring surfaces of the two legs should be wiped clean, the two legs should be closed, and the alignment between the {{0}} line of the auxiliary ruler and the 0 line of the main ruler should be checked. If it is not aligned, the measurement reading should be corrected according to the original error.
5. After using the vernier caliper, carefully wipe it clean, apply protective oil, and place it flat inside the cover. To prevent rusting or bending.
The spiral micrometer, also known as a micrometer, spiral micrometer, or micrometer, is a more precise tool for measuring length than a vernier caliper. It can accurately measure length up to 0.01mm and has a measurement range of several centimeters.
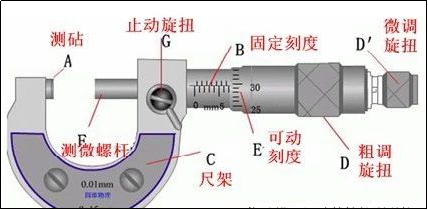
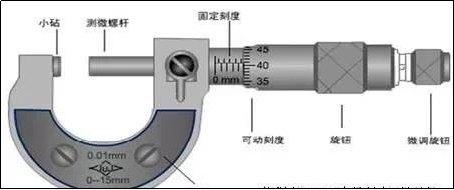
The precision thread pitch of the spiral micrometer is {{0}}.5mm, and there are 50 equal divisions on the movable scale. The movable scale rotates once, and the micrometer screw can move forward or backward by 0.5mm. Therefore, rotating each small division is equivalent to the micrometer screw moving forward or backward by 0.5/50=0.01mm. As can be seen, each small division of the movable scale represents 0.01mm, so the spiral micrometer can be accurate to 0.01mm. Due to the ability to estimate and read one more digit, it is also known as a micrometer.
1. Before use, check the zero point: slowly turn the fine adjustment knob D 'to make contact between the measuring rod (F) and the measuring anvil (A) until the ratchet makes a sound. At this time, the zero line on the movable ruler (movable sleeve) should be aligned with the reference line (long horizontal line) on the fixed sleeve, otherwise there is zero error.
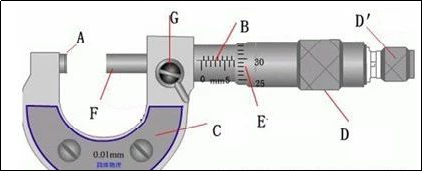
2. Hold the ruler frame (C) with your left hand, and turn the coarse adjustment knob D with your right hand to make the distance between the measuring rod F and the measuring anvil A slightly larger than the measured object. Place the measured object in the frame, and turn the protective knob D 'to clamp the measured object until the ratchet makes a sound. Then, turn the fixed knob G to fix the measuring rod and take a reading.
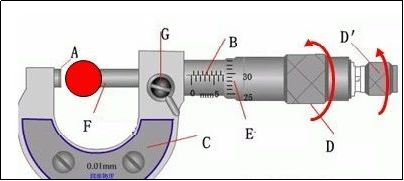
1. First read the fixed scale
2. Read the half scale again. If the half scale line is already exposed, record it as 0.5mm; If the half scale line is not exposed, it is recorded as 0.0mm;
3. Read the movable scale again (pay attention to estimated reading), denoted as n × 0.01mm;
4. The final reading result is a fixed scale+half scale+movable scale
When measuring, it is important to stop using the knob when the micrometer screw is approaching the object being measured, and instead use a fine-tuning knob to avoid excessive pressure. This not only ensures accurate measurement results but also protects the spiral micrometer.
When reading, there is an estimated reading digit in the thousandth, which cannot be thrown away casually. Even if the zero point of the fixed scale is aligned with a certain scale line of the movable scale, it should be read as "0" on the thousandth.
When the workpiece is large, it should be measured on a V-shaped iron or flat plate;


